2020/01/30 - [Back-end/Python] - [Telegram] 무작정 시작하기 (1) - 설치 및 실행
2020/01/30 - [Back-end/Python] - [Telegram] 무작정 시작하기 (2) - CommandHandler
지난 포스트에서는 명령어를 입력하여 이벤트를 실행하는 방법에 대해서 알아보았다. PC를 이용하는 경우에는 명령어를 입력하는게 크게 불편하지 않지만, 스마트폰을 이용하는 경우 다소 불편할 수 있다. 그래서, 봇에서는 버튼을 이용하여 조작할 수 있는 기능을 제공한다. 이번 포스트에서는 이 기능을 활용하여 간단한 예제를 만들어 보도록 하겠다.
1. Message에 버튼 추가하기.
1-1. 소스 작성.
- buttons_bot.py
|
1
2
3
4
5
6
7
8
9
10
11
12
13
14
15
16
17
18
19
20
21
22
23
24
25
26
27
28
29
30
31
32
33
|
#buttons_bot.py
import time
from telegram import InlineKeyboardButton, InlineKeyboardMarkup
from telegram.ext import Updater
from telegram.ext import CommandHandler
BOT_TOKEN='672768316:AAHXpYmnMzGp_eH0i-juikUFU6q9y78CBhA'
updater = Updater( token=BOT_TOKEN, use_context=True )
dispatcher = updater.dispatcher
def cmd_task_buttons(update, context):
task_buttons = [[
InlineKeyboardButton( '1.네이버 뉴스', callback_data=1 )
, InlineKeyboardButton( '2.직방 매물', callback_data=2 )
], [
InlineKeyboardButton( '3.취소', callback_data=3 )
]]
reply_markup = InlineKeyboardMarkup( task_buttons )
context.bot.send_message(
chat_id=update.message.chat_id
, text='작업을 선택해주세요.'
, reply_markup=reply_markup
)
task_buttons_handler = CommandHandler( 'tasks', cmd_task_buttons )
dispatcher.add_handler( task_buttons_handler )
updater.start_polling()
updater.idle()
|
cs |
- 3 ln: Message에 버튼을 추가하기위한 클래스.
* [ InlineKeyboardButton ]: 버튼을 생성하는 기능.
* [ InlineKeyboardMarkup ]: 레이아웃을 구성(Markup)하는 기능.
- 9~10 ln: 봇이 받은 Message를 감시하기 위한 Dispatcher 생성.
- 12 ln: tasks 명령어 이벤트.
- 13~18 ln: 2차원 배열에 InlineKeyboardButton을 생성하여 저장.
* [ [ 컬럼1, 컬럼2 ], [ 컬럼1 ] ]
* 각 행의 컬럼의 수가 일치하지 않는 경우 가장 큰 행의 컬럼수에 맞게 자동으로 병합됨.
* InlineKeyboardButton( 버튼명, callback_data=반환값 )
- 20 ln: Message의 레이아웃을 구성.
* InlineKeyboardMarkup( 2차원 배열 )
- 22~26 ln: Markup된 버튼을 Message에 담아서 발송.
* [ reply_markup ]: Message의 응답을 받을 수 있는 버튼이나 키보드의 Markup을 변경할 때 사용.
- 28~30 ln: [ /tasks ]가 입력되었을 때 이벤트를 발생시키는 Handler생성.
- 32~33 ln: 봇의 메시지 감시 시작.
1-2. 실행.
> python buttons_bot.py
1-3. 실행 결과.
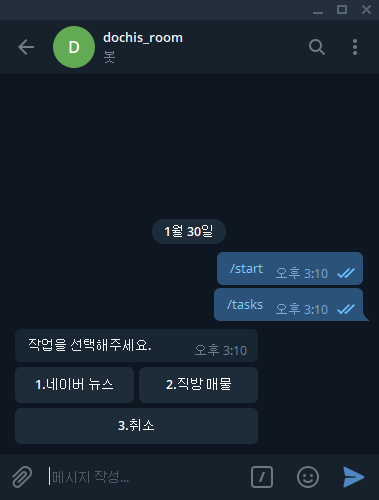
- [ /tasks ]를 입력하면 봇으로부터 버튼과 함께 메시지를 받을 수 있음.
- 지금은 Callback을 만들지 않았기 때문에 눌러도 반응이 없음.
2. 버튼에 Callback 추가하기.
2-1. 소스 수정.
- buttons_bot.py
|
1
2
3
4
5
6
7
8
9
10
11
12
13
14
15
16
17
18
19
20
21
22
23
24
25
26
27
28
29
30
31
32
33
34
35
36
37
38
39
40
41
42
43
44
45
46
47
48
49
50
|
#buttons_bot.py
import time
from telegram import ChatAction
from telegram import InlineKeyboardButton, InlineKeyboardMarkup
from telegram.ext import Updater
from telegram.ext import CommandHandler, CallbackQueryHandler
BOT_TOKEN='672768316:AAHXpYmnMzGp_eH0i-juikUFU6q9y78CBhA'
updater = Updater( token=BOT_TOKEN, use_context=True )
dispatcher = updater.dispatcher
def cmd_task_buttons(update, context):
task_buttons = [[
InlineKeyboardButton( '1.네이버 뉴스', callback_data=1 )
, InlineKeyboardButton( '2.직방 매물', callback_data=2 )
], [
InlineKeyboardButton( '3.취소', callback_data=3 )
]]
reply_markup = InlineKeyboardMarkup( task_buttons )
context.bot.send_message(
chat_id=update.message.chat_id
, text='작업을 선택해주세요.'
, reply_markup=reply_markup
)
def cb_button(update, context):
query = update.callback_query
data = query.data
context.bot.send_chat_action(
chat_id=update.effective_user.id
, action=ChatAction.TYPING
)
context.bot.edit_message_text(
text='[{}] 작업을 완료하였습니다.'.format( data )
, chat_id=query.message.chat_id
, message_id=query.message.message_id
)
task_buttons_handler = CommandHandler( 'tasks', cmd_task_buttons )
button_callback_handler = CallbackQueryHandler( cb_button )
dispatcher.add_handler( task_buttons_handler )
dispatcher.add_handler( button_callback_handler )
updater.start_polling()
updater.idle()
|
cs |
- 3 ln: 채팅방에서 봇의 행동을 표시하기 위한 클래스 추가.
- 5 ln: Callback Handler를 만들기 위한 CallbackQueryHandler 클래스 추가.
- 29 ln: Callback 이벤트.
- 30 ln: Callback을 호출한 메시지의 정보를 담고 있는 객체.
- 31 ln: InlineKeyboardButton에서 callback_data로 정의된 값이 반환됨.
- 33~35 ln: Message를 입력중인 상태를 채팅방에 표시.
* [ send_chat_action ]: TYPING은 메시지를 입력중인 상태를 나타내며, 이외에 Upload나 Find와 같은 상태들을 나타낼 수 있음. 더 자세한 내용은 공식 문서를 참조.
- 37~40 ln: Callback을 호출한 Message를 새로운 Message로 변경.
* [ edit_message_text ]: 기존에 전송된 메시지를 새로운 메시지로 변경하는 기능.
- 44, 47 ln: Callback Handler 생성.
2-2. 실행.
> python buttons_bot.py
2-3. 실행 결과.
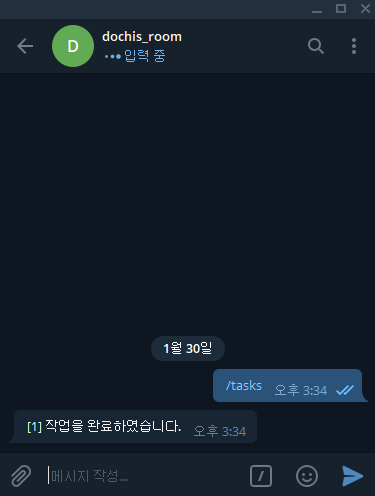
- [ /tasks ] 명령어로 받은 버튼(1.네이버뉴스)을 클릭하면 위와 같은 결과를 얻을 수 있음.
- 상단에 [ 입력 중 ]이라는 문구가 노출되는 것을 볼 수 있음.
3. 최종 소스.
3-1. 소스 수정.
- buttons_bot.py
|
1
2
3
4
5
6
7
8
9
10
11
12
13
14
15
16
17
18
19
20
21
22
23
24
25
26
27
28
29
30
31
32
33
34
35
36
37
38
39
40
41
42
43
44
45
46
47
48
49
50
51
52
53
54
55
56
57
58
59
60
61
62
63
64
65
66
67
68
69
70
71
72
73
74
75
76
|
#buttons_bot.py
import time
from telegram import ChatAction
from telegram import InlineKeyboardButton, InlineKeyboardMarkup
from telegram.ext import Updater, Filters
from telegram.ext import CommandHandler, MessageHandler, CallbackQueryHandler
BOT_TOKEN='672768316:AAHXpYmnMzGp_eH0i-juikUFU6q9y78CBhA'
updater = Updater( token=BOT_TOKEN, use_context=True )
dispatcher = updater.dispatcher
def cmd_task_buttons(update, context):
task_buttons = [[
InlineKeyboardButton( '1.네이버 뉴스', callback_data=1 )
, InlineKeyboardButton( '2.직방 매물', callback_data=2 )
], [
InlineKeyboardButton( '3.취소', callback_data=3 )
]]
reply_markup = InlineKeyboardMarkup( task_buttons )
context.bot.send_message(
chat_id=update.message.chat_id
, text='작업을 선택해주세요.'
, reply_markup=reply_markup
)
def cb_button(update, context):
query = update.callback_query
data = query.data
context.bot.send_chat_action(
chat_id=update.effective_user.id
, action=ChatAction.TYPING
)
if data == '3':
context.bot.edit_message_text(
text='작업이 취소되었습니다.'
, chat_id=query.message.chat_id
, message_id=query.message.message_id
)
else:
context.bot.edit_message_text(
text='[{}] 작업이 진행중입니다.'.format( data )
, chat_id=query.message.chat_id
, message_id=query.message.message_id
)
if data == '1':
crawl_navernews()
elif data == '2':
crawl_zigbang()
context.bot.send_message(
chat_id=update.effective_chat.id
, text='[{}] 작업을 완료하였습니다.'.format( data )
)
def crawl_navernews():
time.sleep( 5 )
print( '네이버에서 뉴스를 수집했다.' )
def crawl_zigbang():
time.sleep( 5 )
print( '직방에서 매물을 수집했다.' )
task_buttons_handler = CommandHandler( 'tasks', cmd_task_buttons )
button_callback_handler = CallbackQueryHandler( cb_button )
dispatcher.add_handler( task_buttons_handler )
dispatcher.add_handler( button_callback_handler )
updater.start_polling()
updater.idle()
|
cs |
- 38~67 ln: 각 버튼마다 이벤트를 부여하여 수행하도록 하였음.
3-2. 실행.
> python buttons_bot.py
3-3. 실행 결과.


- [ 1.네이버뉴스 ]버튼을 클릭하면 '[1] 작업이 진행중입니다.'라는 Mesage로 변경.
- 처리가 완료되면 '[1] 작업을 완료하였습니다.'라는 Message를 한번 더 전송.
- 명령 프롬프트에는 '네이버에서 뉴스를 수집했다.'라는 Log를 출력.
4. 마치며.
- 이번 포스트에서는 텔레그램 봇을 활용하는 예제를 다루어보았다. 이번에는 Message에 버튼을 달아서 보냈는데 ReplyKeyboardMarkup을 사용하면 사용자의 입력창에 버튼을 만들 수도 있다. 잘만 이용하면 게임도 충분히 만들 수 있을 것이라고 생각된다.
- 텔레그램 봇은 간단하지만 잘 이용하면 강력한 기능으로 만들 수 있기 때문에 익혀두면 써먹을데가 많을 것 같다.
'Back-end > Python' 카테고리의 다른 글
| [크롤링] Selenium으로 특가 상품 수집 (2) - Selenium 설정 (0) | 2020.01.31 |
|---|---|
| [크롤링] Selenium으로 특가 상품 수집 (1) - 프로젝트 준비 (0) | 2020.01.31 |
| [Telegram] 무작정 시작하기 (2) - CommandHandler (0) | 2020.01.30 |
| [Telegram] 무작정 시작하기 (1) - 설치 및 실행 (0) | 2020.01.30 |
| [Celery] 무작정 시작하기 (5) - Monitoring (0) | 2020.01.28 |


댓글