2020. 1. 31. 18:02ㆍBack-end/Python
2020/01/31 - [Back-end/Python] - [크롤링] Selenium으로 특가 상품 수집 (1) - 프로젝트 준비
2020/01/31 - [Back-end/Python] - [크롤링] Selenium으로 특가 상품 수집 (2) - Selenium 설정
지난 포스트에서 Selenium을 Browser 없이 실행시키고 로그도 출력되지 않도록 설정해보았다. 그러면서, 수집 대상의 전체 페이지 소스를 출력만 해보았는데, 이번에는 원하는 특정 요소(HTML태그, Elements)를 찾아서 그 안에 있는 데이터를 수집하는 방법에 대해서 알아보도록 하겠다.
1. 수집 대상 분석.
1-1. 수집 대상은 11번가 쇼킹딜의 상품 목록.
1-2. Chrome 브라우저를 통해 수집 대상 사이트 접속.
- http://deal.11st.co.kr/html/nc/deal/main.html
1-3. [ 개발자도구 ] 실행.
- [ F12 ] 또는 [ Ctrl ] + [ Shfit ] + [ i ] 단축키 입력.
- 웹 페이지를 오른쪽 클릭 후 [ 검사 ] 클릭.
1-4. 왼쪽 상단에 Element Selector 클릭하여 실행.
- [ Ctrl ] + [ Shfit ] + [ C ] 단축키 사용 가능.

1-5. 수집 대상의 Element 선택.

- 마우스 커서를 움직이면 현재 커서가 위치한 곳의 Element를 표시해줌.
- 클릭할 경우 개발자 도구에서 해당 Element의 태그를 표시해줌.
- 마우스 커서에 따라 표시되는 위치가 사진과 다를 수 있음.
- 원하는 Element의 위치를 파악하는 용이므로 대략적인 위치만 파악하는 용도로 사용.
* 실제 우리가 사용할 Element는 '<ul class="cfix">' 태그임.
1-6. Element의 CSS Selector 복사.

- [1-5]에서 찾은 Element는 <div>이지만, 실제 목록은 <ul>임.
- <ul> 태그를 오른쪽 클릭하여 [ Copy ] > [ Copy selector ]를 선택하여 CSS Selector를 클립보드에 복사.
* 붙여넣기를 해보면 [ #emergencyPrd > div > ul ]이 나옴.
* 실제 상품은 <li>태그에 있기 때문에 [ #emergencyPrd > div > ul > li ]으로 수정.
1-7. 정리.
- CSS Selector를 복사하는 이유는 XPath와 비교해보기위함.
- 앞으로는 [1-6]에서 [ Copy XPath ]을 사용하여 [ XPath ]를 구할 것이므로 참고.
2. 상품 목록 수집.
2-1. 소스 수정.
- crawl.py
|
1
2
3
4
5
6
7
8
9
10
11
12
13
14
15
16
17
18
19
20
21
|
from selenium import webdriver
from selenium.webdriver.chrome.options import Options
URL = 'http://deal.11st.co.kr/html/nc/deal/main.html'
DRIVER_PATH = './crawler/drivers/chromedriver.exe'
chrome_options = Options()
chrome_options.add_argument( '--headless' )
chrome_options.add_argument( '--log-level=3' )
chrome_options.add_argument( '--disable-logging' )
chrome_options.add_argument( '--no-sandbox' )
chrome_options.add_argument( '--disable-gpu' )
driver = webdriver.Chrome( executable_path=DRIVER_PATH, chrome_options=chrome_options )
driver.get( URL )
elements = driver.find_elements_by_css_selector('#emergencyPrd > div > ul > li')
print( '상품 개수: {}'.format( len(elements) ) )
print( elements[0].get_attribute('innerHTML') )
|
cs |
- 17 ln: 상품 목록을 탐색.
* [ find_elements_by_css_selector ]: CSS Selector로 요소들을 탐색하여 list를 반환함.
- 19 ln: 상품의 개수 출력.
- 20 ln: 탐색한 요소의 HTML 태그 출력.
2-2. 실행.
> python crawl.py
2-3. 실행 결과.

- 상품을 총 26개 수집하였음.
- 첫번째 상품의 HTML 태그를 출력하였는데, 언뜻봐도 상품의 정보가 있음.
2-4. 정리.
- 요소를 탐색할 때 [ find_elements_by~ ] 함수를 사용.
- 's'가 있으면 모든 Element를 탐색하여 list로 반환함, 없는 경우에는 빈 list를 반환함.
- 's'가 없으면 가장 먼저 탐색되는 1개만 수집함, 없는 경우에는 None.
3. 상품 정보 수집.
3-1. 상품 정보가 담긴 요소의 CSS Selector 복사.
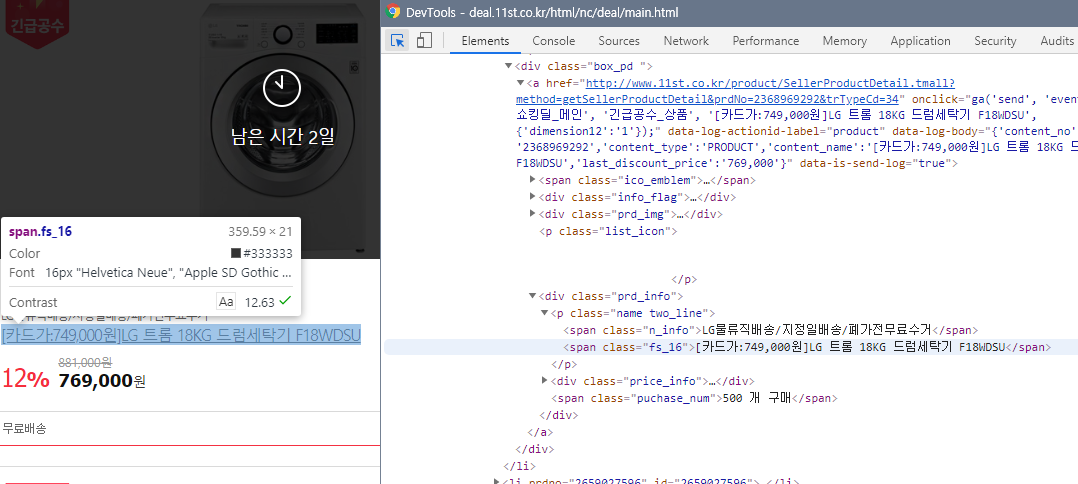
- [1-5]와 같은 방법으로 상품명을 선택하면 '<span class="fs_16">'태그를 가리킴.
- 이 태그를 오른쪽 클릭하여 [ Copy ] > [ Copy Selector ]를 선택하여 CSS Selector 복사.
* 붙여넣기를 해보면 [ #\32 368969292 > div > a > div.prd_info > p > span.fs_16 ]이 나옴.
- [ #\32 368969292 > ]이 부분은 <li>태그라는 것을 유추할 수 있음.

- 우리는 미리 <li>태그의 목록을 구했기때문에 필요없는 부분이므로 삭제.
* [ div > a > div.prd_info > p > span.fs_16 ]만 사용.
- 같은 방법으로 상품가격을 구하면 아래와 같음.
* [ div > a > div.prd_info > div > span.price_detail > strong ]
3-3. Selector 정리.
- 상품목록: #emergencyPrd > div > ul > li
- 상품명: div > a > div.prd_info > p > span.fs_16
- 상품가격: div > a > div.prd_info > div > span.price_detail > strong
3-2. 소스 수정.
- crawl.py
|
1
2
3
4
5
6
7
8
9
10
11
12
13
14
15
16
17
18
19
20
21
22
23
24
25
26
27
28
29
30
31
32
33
|
from selenium import webdriver
from selenium.webdriver.chrome.options import Options
URL = 'http://deal.11st.co.kr/html/nc/deal/main.html'
DRIVER_PATH = './crawler/drivers/chromedriver.exe'
chrome_options = Options()
chrome_options.add_argument( '--headless' )
chrome_options.add_argument( '--log-level=3' )
chrome_options.add_argument( '--disable-logging' )
chrome_options.add_argument( '--no-sandbox' )
chrome_options.add_argument( '--disable-gpu' )
driver = webdriver.Chrome( executable_path=DRIVER_PATH, chrome_options=chrome_options )
driver.get( URL )
elements = driver.find_elements_by_css_selector('#emergencyPrd > div > ul > li')
print( '상품 개수: {}'.format( len(elements) ) )
for el in elements:
el_title = el.find_element_by_css_selector('div > a > div.prd_info > p > span.fs_16')
el_price = el.find_element_by_css_selector('div > a > div.prd_info > div > span.price_detail > strong')
tagName = el_title.tag_name
className = el_title.get_attribute('class')
title = el_title.text
price = el_price.text
print( '='*50 )
print( 'tagName: {}'.format( tagName ) )
print( 'className: {}'.format( className ) )
print( 'title: {}'.format( title ) )
print( 'price: {}'.format( price ) )
|
cs |
- 20 ln: 반복문을 수행하면서 <li>요소를 하나씩 가지고옴.
- 21 ln: <li>태그에서 상품명이 있는 Element를 한번 더 탐색.
* [ find_element_by_css_selector ]: 's'가 없으므로 1개의 Element만 탐색.
- 22 ln: <li>태그에서 상품가격이 있는 Element를 한번 더 탐색.
- 24 ln: 상품명 Element의 태그명 가져오기.
- 25 ln: 상품명 Element의 class 속성 가져오기.
- 26 ln: 상품명 Element의 text 가져오기.
- 27 ln: 상품가격 Element의 text 가져오기.
3-3. 실행.
> python crawl.py
3-4. 실행 결과.

- 각 상품별로 태그, class, 상품명, 상품가격이 정상적으로 출력됨.
3-5. 정리
- 전체 Element에서 같은 'id'값을 갖는 Element가 존재하면 [3-1]과 같이 복사됨.
* id 속성은 유일하게 만들어야 하는데, 잘못된 설계임.
4. XPath를 이용한 정보 수집.
4-1. 이전 단계에서 [ Copy ] > [ Copy XPath ]를 사용하여 아래와 같이 경로를 복사.
- 상품목록: //*[@id="emergencyPrd"]/div/ul/li
- 상품명: div/a/div[3]/p/span[2]
- 상품가격: div/a/div[3]/div/span[2]/strong
4-2. 소스 수정.
- crawl.py
|
1
2
3
4
5
6
7
8
9
10
11
12
13
14
15
16
17
18
19
20
21
22
23
24
25
26
27
28
29
30
31
32
33
|
from selenium import webdriver
from selenium.webdriver.chrome.options import Options
URL = 'http://deal.11st.co.kr/html/nc/deal/main.html'
DRIVER_PATH = './crawler/drivers/chromedriver.exe'
chrome_options = Options()
chrome_options.add_argument( '--headless' )
chrome_options.add_argument( '--log-level=3' )
chrome_options.add_argument( '--disable-logging' )
chrome_options.add_argument( '--no-sandbox' )
chrome_options.add_argument( '--disable-gpu' )
driver = webdriver.Chrome( executable_path=DRIVER_PATH, chrome_options=chrome_options )
driver.get( URL )
elements = driver.find_elements_by_xpath('//*[@id="emergencyPrd"]/div/ul/li[position()<=3]')
print( '상품 개수: {}'.format( len(elements) ) )
for el in elements:
el_title = el.find_element_by_xpath('div/a/div[3]/p/span')
el_price = el.find_element_by_xpath('div/a/div[3]/div/span[2]/strong')
tagName = el_title.tag_name
className = el_title.get_attribute('class')
title = el_title.text
price = el_price.text
print( '='*50 )
print( 'tagName: {}'.format( tagName ) )
print( 'className: {}'.format( className ) )
print( 'title: {}'.format( title ) )
print( 'price: {}'.format( price ) )
|
cs |
- 17 ln: 상품목록을 XPath를 사용하여 탐색하도록 변경.
* [ position()<=3 ]: 3개의 Element만 탐색하도록 필터링.
- 21 ln: 상품명을 XPath를 사용하여 탐색하도록 변경.
- 22 ln: 상품가격을 XPath를 사용하여 탐색하도록 변경.
4-3. 실행.
> python crawl.py
4-4. 실행 결과.
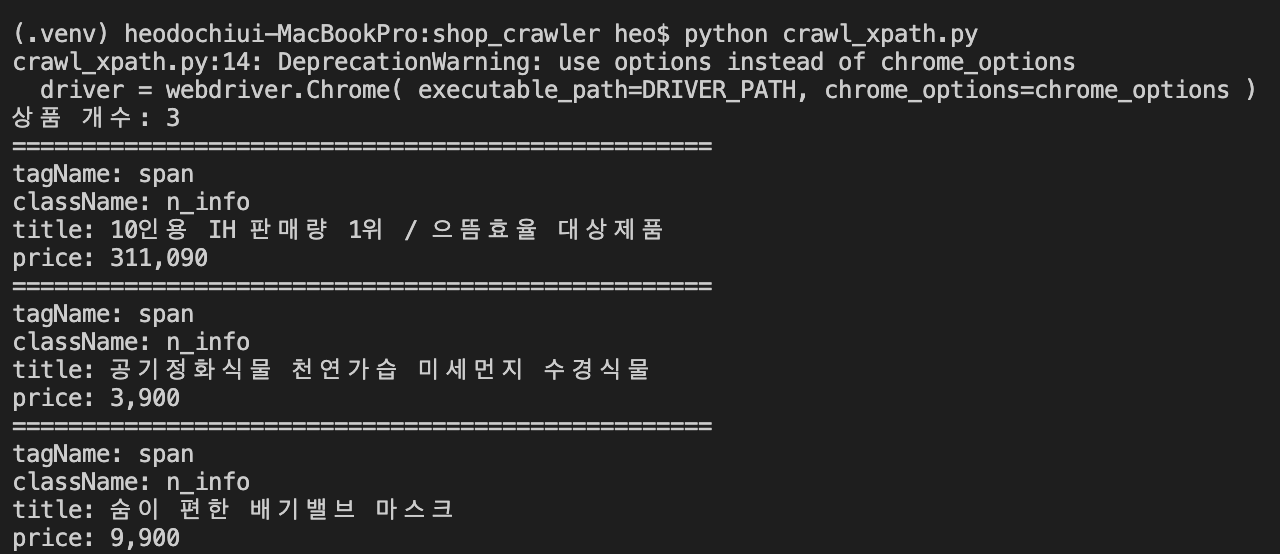
- 상품 개수가 3개만 조회됨.
4-5. 정리.
- XPath를 사용하는 이유.
* CSS Selector에서 'id' 속성이 중복되는 경우 제대로 복사되지 않는 경우가 있음.
* Element를 탐색할 때 position과 같이 필터링 할 수 있는 기능을 제공함.
5. 마치며.
- 이것으로 11번가에서 특가상품을 조회하는 Crawler를 만들어보았다. Crawler를 만들 때는 원하는 데이터가 있는 곳을 찾고 패턴을 분석하는게 가장 힘든 부분이다. 분석만 잘 해두면 Crawler는 쉽게 만들 수 있을 것이다.
- 이번 포스트에서는 11번가의 특가상품만 분석해보았는데, 티몬과 위메프도 같은 방법으로 분석하면 된다.
- 다음 포스트에서는 패키지를 모듈화 해보도록 하겠다.
'Back-end > Python' 카테고리의 다른 글
| [크롤링] Selenium으로 특가 상품 수집 (5) - Telegram Bot (0) | 2020.02.03 |
|---|---|
| [크롤링] Selenium으로 특가 상품 수집 (4) - 모듈화 (0) | 2020.02.02 |
| [크롤링] Selenium으로 특가 상품 수집 (2) - Selenium 설정 (0) | 2020.01.31 |
| [크롤링] Selenium으로 특가 상품 수집 (1) - 프로젝트 준비 (0) | 2020.01.31 |
| [Telegram] 무작정 시작하기 (3) - Button Message (0) | 2020.01.30 |